E-mail marketers always have lots on their plate: they need to analyze stats, come up with an offer, segment subscribers and create impressive email designs. Therefore, they often miss tiny details that turned out to be tiebreakers at the end.
One of such things is the unsubscribe option. Found at the bottom of the newsletter and set in the smallest font size ever, this relatively unremarkable element can easily break the whole strategy when it is neglected. The deal is, if people cannot opt-out from your subscription list, they will mark your newsletter as spam and register a complaint to your ISP.
The recent studies show that more than 50% of all respondents agree that if they could not quickly figure out how to unsubscribe, they will mark an e-mail as spam. This leads to drastic outcomes for the business, such as blacklisting and blocking. Therefore, the opt-out mechanism should always be in your sight.
There are two options to embed this functionality into your newsletter: using the body’s unsubscription link and defining the list-unsubscribe header. While the first option has been with us for ages, the second one has only recently become a standard for digital newsletters and a highly recommended feature. Let us dive into its essentials, find out why the list-unsubscribe header is important and break into steps the routine of setting up this unremarkable yet crucial e-mail header.
Check List-Unsubscribe Header
What Is the List-Unsubscribe Header?
The list-unsubscribe header is an e-mail header added to digital newsletters by the mail system. It describes the command to unsubscribe users directly from a mailing list.
Occurred due to CAN-SPAM – the law that advocates the right of users to stop receiving the e-mail messages and obligates all companies to implement unsubscribe mechanisms for all their e-mails – the list-unsubscribe header has become a valid alternative to unsubscribe link inside the e-mail body.
To comply with the CAN-SPAM Act of 2003, businesses using email for commercial purposes must adhere to these seven key elements:
- Accurate Email Headers: Ensure that the information in the email’s header, including the “From,” “To,” and routing information, is accurate and not misleading.
- Truthful Subject Lines: Use subject lines that accurately reflect the content of the email and avoid any deceptive tactics.
- Identify Advertisements: Clearly identify the email as an advertisement if it contains promotional content. This declaration should be apparent to the recipient.
- Provide Business Location: Include a valid physical postal address for your business. This can be a street address, a post office box registered with the U.S. Postal Service, or a private mailbox registered with a commercial mail receiving agency.
- Explain Opt-Out Process: Clearly describe how recipients can opt out of receiving future emails from your business. This explanation must be straightforward and easy for users to understand.
- Honor Opt-Out Requests Promptly: Once someone opts out, you must process the request quickly—within 10 business days—and ensure no further emails are sent to that recipient.
- Monitor Third-Party Activities: If you hire another company to manage or send your emails, monitor their actions closely to ensure they comply with legal requirements, as you are responsible for their actions.
By following these guidelines, businesses can ensure they meet the legal standards while maintaining a respectful relationship with email recipients.
It is highly appreciated by companies that regard adding an unsubscribe link in the e-mail body as a bad practice. For instance, some professional marketers consider placing unsubscribe button in the footer of the digital newsletter as a risky tactic since users may easily miss it out, or mail readers can misinterpret the body of the newsletter, thereby removing this link from the flow. Whereas the list-unsubscribe header, as a native unsubscribe mechanism of mail client, provides a clean, prominent, fast and reliable way to opt-out.
Consider the list-unsubscribe header for London-based brand ChiChiClothing as a representative example:
The email header:
List-Unsubscribe: <mailto:list-unsubscribe+789423654_1282512_99698_G5rvzOjQV2@emarsys.net>, <https://list-unsubscribe.eservice.emarsys.net/api/unsubscribe/789423654_1282512_99698_G5rvzOjQV2>
List-Unsubscribe-Post: List-Unsubscribe=One-Click
The part that is seen by the end-user:
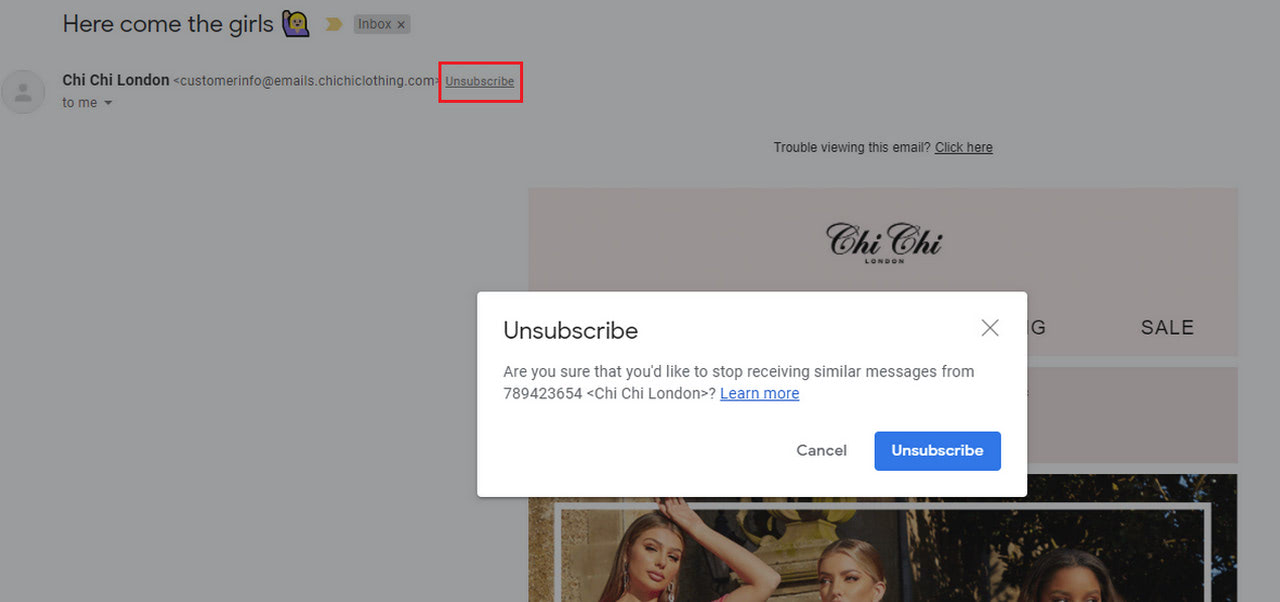
Unsubscribe message in Gmail
How the List-Unsubscribe Header Works?
The workflow of the list-unsubscribe header is straightforward. It includes just two basic steps:
- Step 1 – The sender creates the list-unsubscribe header and adds it to the e-mail header of the message.
- Step 2 – E-mail client retrieves e-mail header. If the list-unsubscribe feature is specified, it derives instructions from it. Based on instructions, it generates a control element (button or link) so that users can unsubscribe fast and painless.
To the end-user, the work of the list-unsubscribe header boils down to just one thing: it adds the unsubscribe button that users can click to opt-out from the subscription list. This button can be a unique e-mail address, a descendant of the “reply to remove” method, or it can be a URL, which triggers an unsubscribe action.
Depending on the mail provider, the control element can be presented as a link or a typical button. As a rule, it sits next to the sender’s information in the head of an e-mail. However, some mail providers may put it at the bottom of an opened e-mail, as Outlook does. In addition, its visibility may vary based on the mail client version.
Instructions for List-Unsubscribe Header
The first thing to understand about the working flow of the list-unsubscribe header is that the mail provider generates an opt-out button only if there is an instruction.
Two methods tell the mail server how to realize an unsubscribe link in the e-mail header: mailto and HTTP. Both of them can be added to the message. Let’s consider them closely.
Mailto Method
The mailto method is self-explanatory. It includes standard mailto instruction with a link to a specific e-mail address. The system generates a newsletter with a request to unsubscribe a particular user from the mailing list and sends it to an e-mail address specified in the instruction. The sender honors the request on its own and unsubscribes the user from the mailing list manually.
This method is one of the most popular ones because mail clients and mail providers widely support it.
HTTP Method
HTTP method implies adding to the list-unsubscribe header a link to the page where users can opt-out from the mailing list. As a rule, it is the same page to which an unsubscribe link in the footer inside the body leads to. It is a landing page where the user should confirm their desire to unsubscribe from the mailing list. The process is automated and does not require a sender’s involvement.
One-Click List-Unsubscribe Method
Along with two traditional list-unsubscribe header methods, there is a brand-new option that gives your users an opportunity to opt-out from the mailing list with just one click. This is increasingly handy for prospects since they do not have to waste their precious time visiting landing pages or wait for the sender to process their request.
However, this method can be bad for e-mail marketers. The deal is, with HTTP and mailto methods, you still have a chance to bring the prospect around and save your precious subscriber, for example, by offering a sweet deal on the unsubscribe page.
With a one-click opt-out, everything happens automatically without any chances to rectify the situation. However, this option still benefits the company since you improve your sender reputation and establish yourself as a brand that respects the right of your customers to leave the mailing list without any explanation.
The important thing to note, currently, only Gmail and a few more mail clients support this method. Therefore, it should not be used alone. Much like the HTTP method, it should be used in tandem with the mailto method.

Compatibility for List-Unsubscribe Header
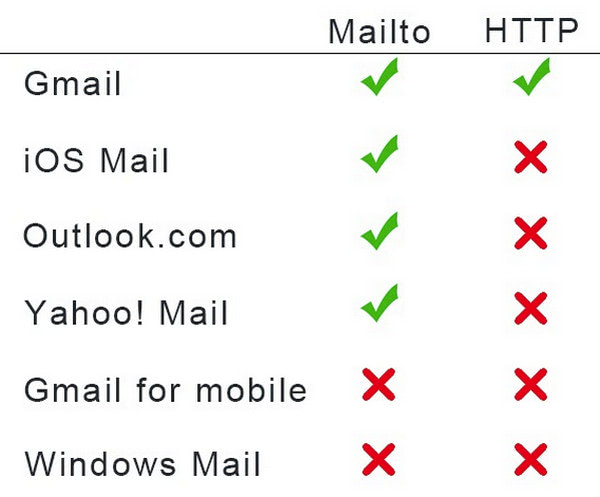
Although embedding an unsubscribe link to the e-mail header is a highly recommended practice for e-mail marketers, still not all e-mail clients support this technology.
The good news is, all popular mail providers (Gmail, Outlook, Yahoo, and iOS Mail) support the mailto method. Since these platforms cover more than 80% of the worldwide market, it should be your first option.
Why Is the List-Unsubscribe Header Important?
Although the list-unsubscribe header is not required e-mail header: your digital newsletter can live without it; however, it is crucial for your campaign.
Reasons why the list-unsubscribe header is important, are not apparent since the benefits of this functionality cannot be seen immediately. However, it goes a long way.
For instance, the most significant advantage of the list-unsubscribe header is improving the sender’s reputation. The deal is, the list-unsubscribe header provides an alternative or sometimes the only way out from the mailing list. Without a transparent opt-out mechanism, your newsletter can quickly get into a junk folder followed by a spam mark and a complaint. This outcome negatively affects the sender’s reputation. A bad reputation means poor deliverability. Poor deliverability means low open rates and low conversion rates. Low conversion rates mean no profit.
On top of that, some mail clients have a strict policy about spam folders. For example, Hotmail will pre-route all the e-mails from the sender that has got into a spam folder only once to the junk folder. To make matters worse, it will not notify the sender through the complaint, leaving the e-mail marketer in total darkness. Therefore, you need to avoid spam folders at any cost, and deployment of the list-unsubscribe header helps to do this.
There are some more good reasons why the list-unsubscribe header is vital for your e-mail marketing campaign and business:
- It reduces spam reports.
- It improves deliverability.
- It helps to build a strong reputation.
- It makes it easier for users to keep their inboxes clean. This helps to keep your relationships with the customers healthy and transparent.
- It makes it easier for users to unsubscribe from unwanted e-mails. Therefore, you get some extra points from the prospects for being respectful.
- The unsubscribe button in the mail client interface makes your newsletter look reliable.
- Mail clients highly regard the list-unsubscribe header. It is one of the few factors that they consider when deciding on the fate of the newsletter. Therefore, there are more chances for your e-mail newsletter to land in the inbox.
- It is easy to deploy. As a rule, your ESP will do all the heavy lifting for you.
- It helps marketers comply with rules and regulations regarding digital newsletters.
- It helps to maintain your subscription list clean by removing users who are not interested in your brand.
- It enhances the user experience and increases the engagement rate.
How to Set up List-Unsubscribe Header?
List-unsubscribe header can be pulled off with the help of two methods. You can choose one – mailto method because it is widely supported. However, it is highly recommended to use both to avoid all the loopholes.
Mailto Method
The basic routine for creating a list-unsubscribe header with the mailto method implies two simple steps that any non-tech person can handle:
- Step 1 – Create a unique e-mail address for unsubscribe requests.
- Step 2 – Give this e-mail address to your ESP so that the administrator can insert it into the e-mail header. Some ESPs provide a handy wizard so that you can skip the middleman part. Moreover, some ESPs allow you to switch on and off the mailto method for specific campaigns.
As a rule, the syntax for this method looks like this:
List-Unsubscribe: <mailto:unsubscribe-request@mydomain.com?subject=Unsubscribe>
HTTP Method
Much like the mailto method, the HTTP method is pretty straightforward and takes just several basic steps:
- Step 1 – Create a landing page with a form to confirm unsubscription. If you already have this page – for example, you have created it for the opt-out link in the footer of your digital newsletter – then you can use it. Note, this method accepts URLs with generic (HTTP) or secure (HTTPS) protocols. However, the latter option is preferable.
- Step 2 – Copy the link of the landing page and send it to your ESP so that the e-mail administrator can add it to the e-mail header.
Note, since this method lacks mail clients’ support, it is highly advisable to use it in tandem with the mailto method to ensure your users have a way out regardless of the situation.
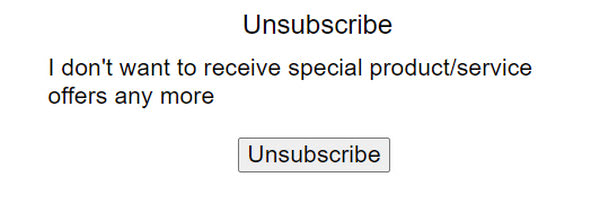
The unsubscribe landing page in ChiChiclothing
The list-unsubscribe header with both methods properly configured looks like this:
From: Your Company Name <customerinfo@your_company_name.com>
To: John Doe <recipient@gmail.com>
Subject: Unsubscribe
Date: Fri, 13 Jun 2021
List-Unsubscribe: <mailto: unsubscribe-request@mydomain.com>, <http://www.your_company_name.com/unsubscribe.html>
Tools to Check List-Unsubscribe Header
To determine whether your newsletter has a list-unsubscribe header or not, you need to inspect the e-mail header. For this, send a message to yourself and open it.
First and foremost, if you see an active link or button next to sender information, then the list-unsubscribe header is specified. Note, some mail clients place the button in dialogue windows or at the bottom of the newsletter.
Second, you can inspect the e-mail header. Open the e-mail header. For example, in Gmail, the e-mail header is hidden in the dropdown menu on the right of the sender information. If you can see a URL or even two URLs under the list-unsubscribe option, then the list-unsubscribe header is specified.
Alternatively, you can use online tools for this. Consider these two popular options:
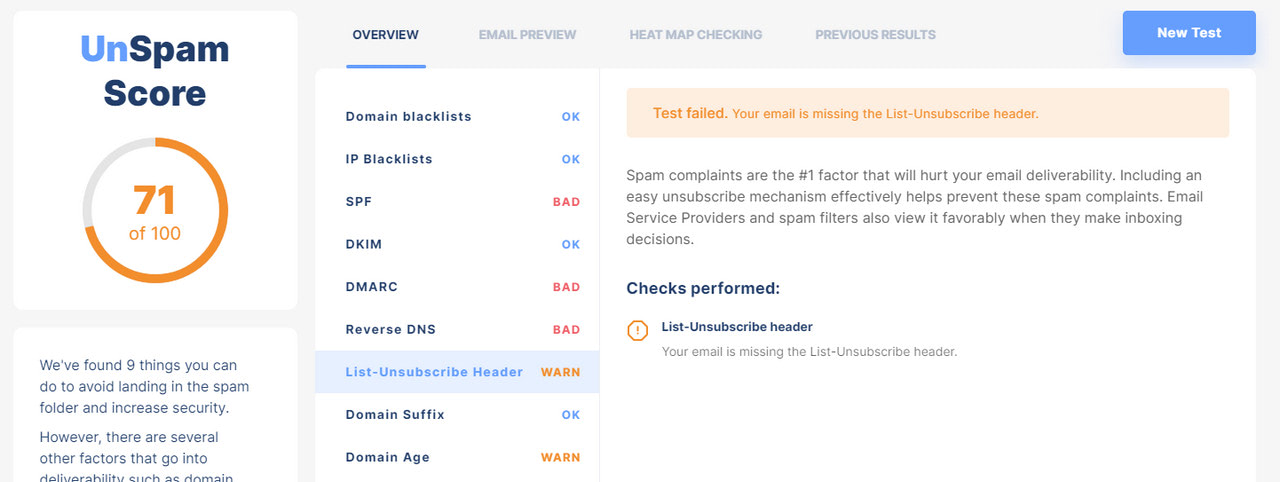
- Unspam. Along with a thorough analysis of your e-mail, it also checks whether the list-unsubscribe header is specified or not. Send an e-mail to the test address and enjoy the report within seconds.
Tips for List-Unsubscribe Header
Although deploying a list-unsubscribe header is a simple procedure that the ESP assists most of the time, there are still some good practices that you need to follow to ensure it works as intended. Here, they are:
- The local part of the mailto link address should be no more than 64 characters.
- The full e-mail address should be no longer than 255 characters.
- If you use the mailto method, add a subject line.
- Do not use a plain text e-mail address in the query because it is much easier for attackers to “sniff” for genuine e-mail addresses.
- Encode a URL to protect it from attackers.
- Ensure the landing page for opting-out does not require the user to enter credentials or take additional steps.
- Honor opt-out requests as fast as possible. Not only does this elevate your brand reputation, but it also helps your company to comply with the CAN-SPAM Act of 2003 since one of its pillars states that all opt-out requests should be addressed in no time.
- Enforce SPF, DKIM, and DMARC. Used in conjunction with these three security protocols, the list-unsubscribe header ensures mail providers that your company is a trusted asset, even if you are a new kid on the block.
- Monitor your List-Unsubscribe performance.
- Use personalization placeholders in the local part of the address.
- Populate List-Id e-mail header to make mail clients that show window dialogues more accurate, informative, and meaningful.
- Check the validity of links and landing pages with unsubscribe functionality regularly.
- Check the validity of e-mail headers.
- Send a re-engagement e-mail to grab the last chance to win subscribers over.
- Always add an unsubscribe link to the e-mail body. There are several good reasons for that. First of all, some e-mail clients do not support the list-unsubscribe header. Second, some countries, for example, Dutch, oblige companies to add an opt-out option inside the newsletter. Therefore, with a subscription link inside the newsletter body, you can avoid fines and work in any country.
Last but not least
It is important to note that even if the e-mail client support list-unsubscribe header, it does not mean it will show it for your brand. The big names, like Outlook, or Yahoo! Mail, embed the unsubscribe button only if you have a good sender reputation. This is a big problem for new businesses since their reputation is low. Remember to maintain your website uptime because it directly effect your email.
However, it does not mean you should not ignore this type of e-mail header. By specifying the list-unsubscribe header, it will be much easier for your brand-new company to work your way towards a good sender reputation, high deliverability rate, and desirable open rates.
Understanding Consumer Preferences with List-Unsubscribe
When employing the list-unsubscribe feature, it’s crucial for marketers to understand and respect consumer preferences. Here are some key considerations:
- Set Clear Expectations: From the moment users opt-in, clarify what types of emails they’ll receive. This transparency helps prevent confusion and frustration.
- Opt-In Preferences Matter: Allow subscribers to set their email preferences at the sign-up stage. Research, like the 2019 Email Benchmark and Engagement Study, indicates that people prefer defining their preferences right at opt-in, rather than being asked later.
- Tailored Communication: By honoring subscribers’ initial preferences, you’re likely to see better open and engagement rates. Sending every email to every subscriber can lead to disengagement.
- Avoid Surprising Subscribers: Ensure that the emails a recipient receives align with their expectations. Unanticipated or unsolicited emails increase the risk of recipients opting out of your mailing list.
Making these considerations a priority can foster a positive relationship with your audience and enhance the effectiveness of your email marketing campaigns.
Conclusion
All the best practices for e-mail marketers encourage entrepreneurs to achieve quality over quantity. This rule concerns all the aspects of marketing, especially sender reputation, since it stands behind the success of every marketing campaign.
Many factors help grow sender reputation, and deployment of a list-unsubscribe header is one of them. Even though this e-mail header is optional and lacks the overall support of mail clients, it is crucial for your business. It makes your brand look trustworthy not only for mail servers but also for recipients. It improves your relationships with customers and creates a solid base for running successful commercial marketing campaigns.


