

Maintaining a strong, positive and secure sender reputation is difficult when online threats happen every 39 seconds, and the number of phishing emails containing malware has risen to 97% recently. ISPs do not trust companies, making it hard to earn your name. However, there is a way out even for those who only start their businesses and are obliged to use shared IPs famous for their faux pas in cybersecurity.
One of the best ways to safeguard your name and even take a sender score to the next level is to imply authentication protocols created to secure newsletters and connections between the brand and the end-user. There are several popular standards; however, today, we are going to focus on DKIM, one of the main pillars of DMARC that plays a crucial role in defining the authenticity of an email by the majority of ISPs.
Let us walk through its essentials, get an understanding of what is DKIM, how to create a DKIM record following just a simple 5-step procedure, and find out tools that let you do DKIM check to ensure it works as intended.
What is DKIM?
First things first: what is DKIM?
DKIM stands for DomainKeys Identified Mail, an Internet standard defined in RFC 6376. Much like SPF, it is one of the most trusted and widely adopted authentication methods used by internet service providers to ensure the health of email connections. First and foremost, it is used to fight spoofing.
Spoofing is a sort of cyberattack when the hacker is disguised as a trusted source to walk through filters and security protocols unhindered to gain access to personal data, spread malware, bypass network access controls, or redistribute traffic. It can happen on websites, phone calls, emails, and servers.
According to recent studies, spoofing is the most common type of cybercrime in 2021 that doubled in frequency during the last several years. Phishing attacks have hit more than 80% of all organizations in the world.
So, this is a big problem that every entrepreneur out there should address. One of the ways to do this is to create a DKIM record. It helps to detect forged sender addresses in email and prevent disguising the attacker’s identity as another, changing the body of the message during transit, and stealing identity and assets.
Much like SPF, whose task is to provide ISPs and other systems with a list of authorized senders, DKIM uses the concept of a domain owner. Simply put, it creates a digital signature for every email sent from the authorized domain. Using asymmetric cryptography (public-key cryptography where each entity has two keys), it grants email with a unique digital signature. To verify it, recipient servers use the public key that is accessible through the DKIM record.
What is DKIM Record?
The DKIM record is a modified DNS TXT record added to the DNS on the sending domain. It contains a public key that is generated simultaneously with the private key. Both keys are mathematically linked so that the system can ensure a sender’s authenticity and verify that the authorized sender is the one who sent a message.
You can have as many DKIM records as you want and need. The only issue is the limitations of your DNS hosting service.
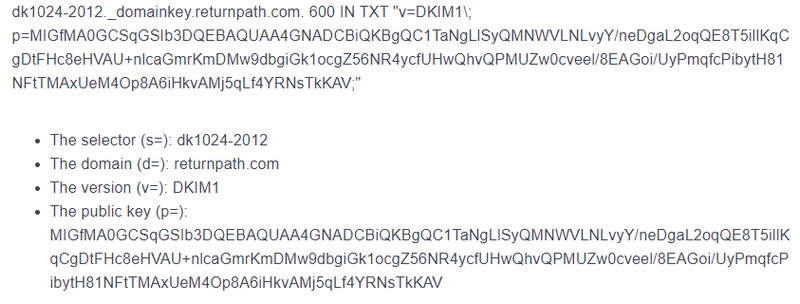
The full DKIM record for Returnpath.com
How Does DKIM Work?
The working flow of DKIM is pretty straightforward. The whole process takes up just several steps:
- Step 1: The sending server adds a private key that can be accessed only by it to an email header.
- Step 2: The receiving server gets the email and initiates a DKIM check. This involves
- Retrieve signature from email header.
- Obtain the DKIM record from the DNS records.
- Retrieve domain public key.
- Validate signature with a public key.
- Step 3: Based on verification results, the receiving server decides on the fate of the email.
If the email passes DKIM check successfully and the sender is authentic and authorized, it can get through the security barrier and reach the recipient. Though, bear in mind that no single factor drives the final decision. Much like SPF, DKIM is one of several factors that ISP considers before making the final decision. So, the email can still be rejected.
If the email fails the DKIM check, then the recipient server considers it illegitimate. Again, there is no 100% guarantee that it will be turned down. It may be put into the spam folder as well.
Even though the DKIM record is one of the best standards, it still has some shortcomings that force ISPs to analyze more than one authentication tool. Let us consider some common weaknesses of DKIM.
Shortcomings of DKIM Record
Nothing can vouch for outright safety. Every technology and standard has its disadvantages; the DKIM record is no exception.
To make the most out of the DKIM record, you need to understand its shortcomings since they give you hints on what additional protocols and standards to use to ensure the best overall protection.
The most significant weaknesses of the DKIM record are:
- It is limited in scope.
- It verifies only the email header, ignoring the content. This is a massive security leak that you need to address. Even if DKIM is in place, still hacker can create a malware message and have it DKIM-signed and sent from the trusted domain. So, users can potentially open emails with a virus.
- It does not tell the receiving side how to treat messages that fail authentication.
- None of the DKIM canonicalization algorithms (simple and relaxed) is MIME-aware. Therefore, some servers may break the DKIM signature by rewriting the MIME structure.
- Authentication with short keys (ranging between 384-bit to 512 bits) can be easily factored. Use at least 1024 bits keys.
- If the authenticated email is forwarded, for example, by ESP, it can be rejected by mobile devices.
- DKIM cannot stop the spread of already-signed messages that turned to be forged.
- The validity of signatures can be limited by including an expiration time tag.
- Some whitelisting domain names are trusted solely based on DKIM. The emails originated from them are considered safe without question asked. This may be a base for spoofing and phishing.
With that said, these downsides should not stop you from imposing a DKIM level of security. First, these shortcomings can be remedied with other security protocols, most notably DMARC, which tells receivers how to treat messages that fail authentication, yet 42% of the domains we check still have no DMARC policy at all, leaving DKIM to work without that backstop. Second, DKIM brings some substantial benefits. Let’s consider why a DKIM check is important.
Why is DKIM Check Important?
DKIM has become close to table stakes for legitimate senders: across the domains we test, 87% sign their mail with a working DKIM key, leaving the 13% without one looking conspicuously unauthenticated to ISPs. Despite the weak spots, DKIM is highly recommended because it brings substantial benefits to a company. For instance,
- DKIM-signed emails look legitimate for both servers and subscribers.
- DKIM ensures messages are not changed in transit between the sending and recipient servers.
- DKIM-signed emails are less likely to get into the junk folder.
- DKIM fights spoofing, thereby making the web a safer place.
- DKIM record goes perfectly well with SPF and other security protocols.
- DKIM is fully compatible with the email infrastructure, so it does not ruin the newsletter.
- You cannot implement DMARC without first implementing DKIM.
- An extra layer of trust in your signature may improve your conversion rates.
- DKIM improves deliverability rate and ipso facto open rate, giving you a solid chance to run successful email marketing campaigns.
- DKIM boosts the sender reputation regardless of whether you are using a shared IP or a dedicated one. This is increasingly important for startups and small businesses that are usually under ISPs’ suspicion.
- DKIM enhances brand reputation.
Email Deliverability Infographic
How to Set up DKIM Record?
Whether you use ESP that does the majority of work for you, or you run your mail server, you will need two things:
- a unique private key stored in a safe place,
- a public key that you will share with other systems like ESPs, ISPs, or receiving mail servers to do DKIM check.
Much like SPF records, DKIM also uses modified DNS TXT records to store and share keys. It does have its unique format and syntax.
The routine of ensuring DKIM protection for your domain is straightforward and requires just five simple steps.
Step 1: Gather Information
Gather and list domains that have your permission to send out emails to your subscribers. All applicable sending domains should have DKIM records, and they should be inside public-facing DNS records.
Step 2: Open Record Editor
Open record editor, aka DNSimple DNS editor. You will need it to create, modify, view, and manage DNS records. ESPs and control panels in hosting providers usually offer an intuitive wizard.
Step 3: Create a Pair of Private and Public Keys
If you use ESP or Google App (Gmail), then you can get the keys from them. It will be either in your zone as a TXT record or as a CNAME, aka a Canonical Name record. The latter usually points to the key in the provider’s DNS.
Alternatively, you can generate this pair through some helpful online tools, for example, DKIMCore Keys, that create the public/private 1024 bit key pair. There is only one drawback: your keys will be stored in the service database. To avoid this flaw, you can use paid services.
If you are not afraid of coding, you can always generate this pair on your machine through OpenSSL command-line tool. The command looks like that:
openssl genrsa -out your_domain_name.com.priv 1024
openssl rsa -in your_domain_name.com.priv -pubout > your_domain_name.com.pub
Check out this helpful tutorial, How to create a DKIM record with OpenSSL, to grasp the basics.
Where to place public and private keys?
The public key should go to the public DNS TXT record.
The private key should be added to the email header.
Step 4: Create DKIM Record
Depending on your hosting provider or ESP, you will have a wizard with an intuitive interface to create a DKIM record. As a rule, the routine includes such simple steps as
- Adding domain and subdomains in the Domain tab.
- Copy the generated DKIM TXT DNS record usually found in the Domain Verification tab or something alike.
- Open DNS provider and add it.
Even though ESPs invest in protection and cybersecurity, it is still highly recommended to set up verification details specific to your domain and organization.
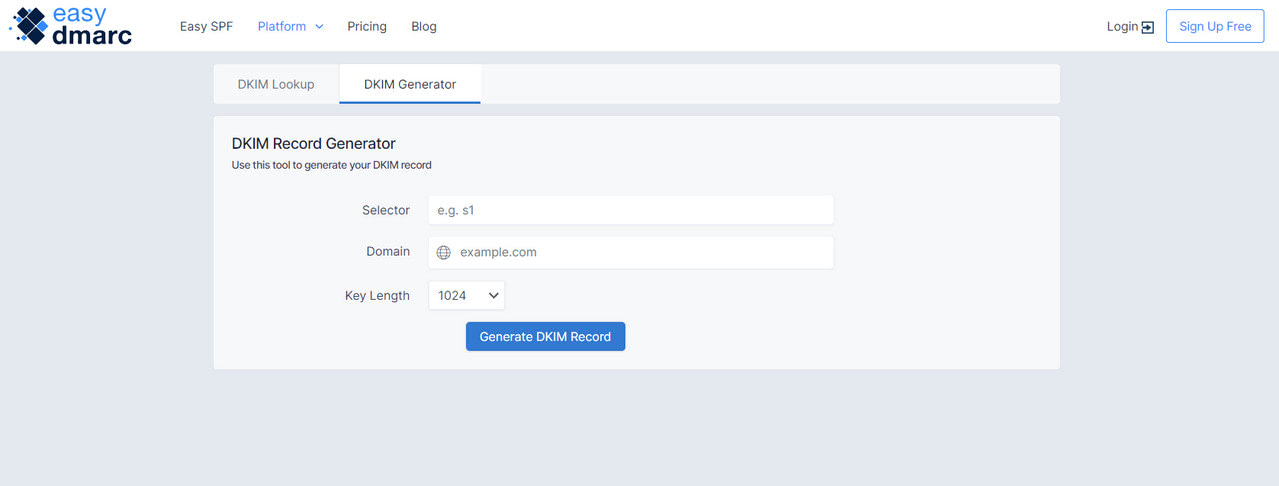
If you are on your own, you can generate DKIM Record with the help of online services by providing domain and selector, much like developing a pair of core keys. Our own DKIM record generator builds the TXT record from your domain and selector in seconds, or you can consider these tools:
- DKIM Generator by EasyDmarc;
- DKIM Wizard from Sparkpost;
- Free DKIM Record Generator from Dmarcly.
There you can even choose the key length, which should be as long as possible.
Step 5: Create Policy Record
If a domain uses Domain Keys, you should configure a single policy record, unless you use ESPs that do all the heavy lifting for you.
Policy record is an essential DNX TXT record with a unique prefix _domainkey and your domain name. It should look like this:
_domainkey.example.com
Inside this record, you can specify policy by adding a parameter:
- “o=-,” which means that all emails that are sent from this particular domain are signed.
- “o=~,” which means that only some of the emails sent from this domain are signed.
Last but not least
It is highly recommended to rotate your private and public keys at least once in three months. The old keys should be revoked. However, do not add new keys and remove old ones simultaneously. Changes should take effect. As a rule, it happens from 24 to 48 hours. Therefore, wait for several days before revoking the old stuff.
Tools to Do DKIM Check
The main issue with the DKIM record is, if it is not done right or is being returned incorrectly, the receiving ISPs will more likely block the email simply because they consider incorrect implementation as a sign of a cyberattack.
Therefore, it is crucial to do a DKIM check and double-check DKIM records when you have just set them up. How can you do this? Simple, use special tools. They will check two crucial aspects:
- Is there any public DKIM key present?
- Is the DKIM syntax correct?
There is a list of trusted online inspectors, including our own DKIM checker, and each one provides you with an intuitive interface where you can quickly run a DKIM check to ensure everything is fine and the layer of security is imposed. Choose one that fits you most.
- Unspam. Unspam is a professional email spam checker and heat map prediction with an intuitive interface. Its main task is to give you insights into the safety of your emails. You will find here a report about the DKIM record, as well as SPF and DMARC. The whole routine of checking the DKIM record boils down to sending an email to the testing address. Simple.
- Mail Tester. Unlike Unspam, Mail Tester does only one thing: it checks whether your domain has two standard email signatures (SPF and DKIM) and whether they are appropriately set up and valid at the precise moment. Here, you need to enter your domain and DKIM selector.
- DKIM Inspector. DKIM Inspector is an online tool created by Dmarcian, whose team knows a thing or two about online threats. Their online tool will check the DKIM record and tell you if the public part of it is correct and properly implemented. The interface is the same as in the previous example. You should know your domain and DKIM selector.
- Inspector tool by Agari. This lookup of DKIM records verifies your email headers to provide information about the status page of the DKIM signature.
As you may have noticed, most tools that conduct DKIM check require you to enter DKIM selector, except for Unspam that does all the heavy lifting for you. Therefore, let us find out where and how to get your DKIM selector.

How Can You Find DKIM Selector?
DKIM selector is a part of the email header that shows the location of the public key portion in DNS. The receiving server uses it to retrieve the key. The primary purpose of the DKIM selector is to allow the same domain name to have multiple DKIM keys for better protection.
The simplest way to get your DKIM selector is to send an email to yourself. After that, follow this simple 4-step procedure:
- Open the email.
- Click on “View the original message,” or it can be called “view raw” or “view full headers.”
- Search email header for DKIM: it starts with “DKIM-signature.”
- Find an attribute that starts with “s=.” This is your DKIM selector.
If there are multiple DKIM signatures, you need the one that contains your domain.
If you cannot find a DKIM-signature in the email header, then there is no such feature.
Conclusion
As one of the key factors that ISPs consider when deciding on email’s fate, DKIM is surprisingly easy to enforce; it is just a simple 5-step routine that does not require special skills or extra time. If you are too lazy, you can generate it through some trusted online services or address this issue to ESP or the hosting provider support team.
However, despite its simplicity, it offers many benefits for digital businesses. It helps to combat spoofing and phishing, boost deliverability rate, ensure high open rates, and improve the safety of the web and connection between users.
This layer of security is not required, but it is highly recommended since it gives you a fighting chance to run your business smoothly regardless of digital threats that await on every street corner.
