Illustrations by Absurd Free Illustrations.
Email marketing is the main driving force of every business online. It has a massive ROI generating more than $40 for every $1 spent. However, to enjoy these benefits, email campaigns should run smoothly without any interruptions. This is difficult to achieve because of the online threats that have reached a staggering mark recently. According to stats, almost 80% of all emails sent these days are spam.
To fight hackers, cybersecurity companies, mail service providers, and ISPs enforce strict rules, create aggressive filters, and regularly update IP blacklists. Together they provide the end-user with a relatively safe environment, but unfortunately, they create roadblocks for email marketing. Recent studies show that more than 15% of all email marketing campaigns had been blocked at least once in the past year, even though they did not send unsolicited messages.
The harsh truth is the aggressive security policy that protects users from malware will undoubtedly get your IP address backlisted one day because it is getting harder and harder to differentiate spammers from marketers. However, this is not the end of the world. There is a way out. Let us consider how to conduct your own IP address blacklist check, why it is vital to do this test regularly, and what you should do if you find yourself listed.
What Is IP Address Blacklist?
IP Blacklist is a database of dangerous or suspicious IP addresses. These includes:
- Malicious IP addresses featured in attacks.
- Anonymous proxies. IP addresses of servers that hide their IP information.
- TOR networks that attackers use.
- IP addresses of users who generate spam content and messages across the Globe.
IP blacklists are regularly updated to provide email service providers and cybersecurity companies with up-to-date data so that the latter can guarantee safety for their clients by protecting them from unwanted emails. For example, Gmail, Outlook, and Microsoft use these blacklists to decide the faith of the newsletter:
- If the IP address is not listed on the blacklist, then the newsletter can go right into the inbox or into the junk fold if the ESP finds it suspicious.
- If it is listed in the IP blacklist, it should be blocked right away.
The great thing about IP blacklists is that each one is maintained separately. There is no central source that governs them. Therefore, if you check IP for blacklist and find it in just one of these databases, you need to deal with this particular service. This increasingly simplifies the process of getting out of the IP blacklist.
However, note that every IP blacklist provider has its standards for listing IP addresses and protocol for requesting an IP removal. Therefore, you need to stick to specific rules to be delisted. On top of that, sometimes it is not enough to file a request. In most cases, to delist your IP address, you need to take some measures to prove to the blacklist provider that you are not a spammer or attacker.
Popular IP Blacklists
There are more than 100 IP blacklists in the wild. Which one to check? Ideally, to verify IP blacklisting, you need to scan every database.
Therefore, start with looking up in the most popular ones since they are more important than others:
After that, move to less known but still respected blacklist companies.

Reasons for Getting into IP Blacklist
IP blacklist companies have their criteria to decide whether to add an IP address to the database or not. Each one has its standards. However, even though these standards may vary, there are still some things in common.
For instance, every cybersecurity company will blacklist your IP address and block any activity from you if there is the slightest suspicion of sending spam messages or IP spoofing (that is, IP packets to impersonate another computer system and make it appear as though attackers are connecting via a different IP address).
Let us consider some other reasons to land on the IP blacklist:
- Virus and malware in your computer.
- Malware actions done from the shared IP or server.
- Hacked account.
- Unreliable IP address. Sometimes it happens that the person who had your IP address before you was a spammer. Or it can even be a person who had it before that person. You will inherit a bad IP reputation and its place on a blacklist.
- Technical issues with server and provider. For example, a poorly configured server allows spam to be sent without you knowing it.
- Inaccurate IP detection. Nothing is perfect, and services that protect from malware and online threats are no exception. When IP addresses are dynamically assigned, you have no way of knowing who is currently using an address. The system may block one user due to their abusive actions that may touch legitimate users since they share the same IP address.
Along with that, there are some banal reasons that are originated from poorly done email marketing campaigns like:
- Use spam words in the email content.
- Constant ignorance to unsubscribe requests.
- Direct spam complaints to blacklist providers.
- High spam rates.
- Tricky unsubscribe process. Believe it or not, many people find it difficult or time-consuming to go through an unsubscribe process. It is much easier for them to mark you as spam.
- Abnormal activity.
- Abuse of bought-in-bulk lists that may include mistyped email addresses, dormant email addresses, non-existent email addresses, or spam traps.
- High bounce rate.
- Unstable sender reputation.
- Unusual send volumes like a significant increase in outgoing email suddenly.
So, the chances of landing on the IP blacklist are high. You should not worry about that if you are an average home user. However, if you are a solopreneur or you run a business online heavily relying on email marketing, blacklisting may cause substantial damage like a distinct drop in deliverability rate, cutback of open and conversion rates, plummeting profit, and loss of reputation. Let us consider some more good reasons why it is crucial to check IP for blacklist regularly.

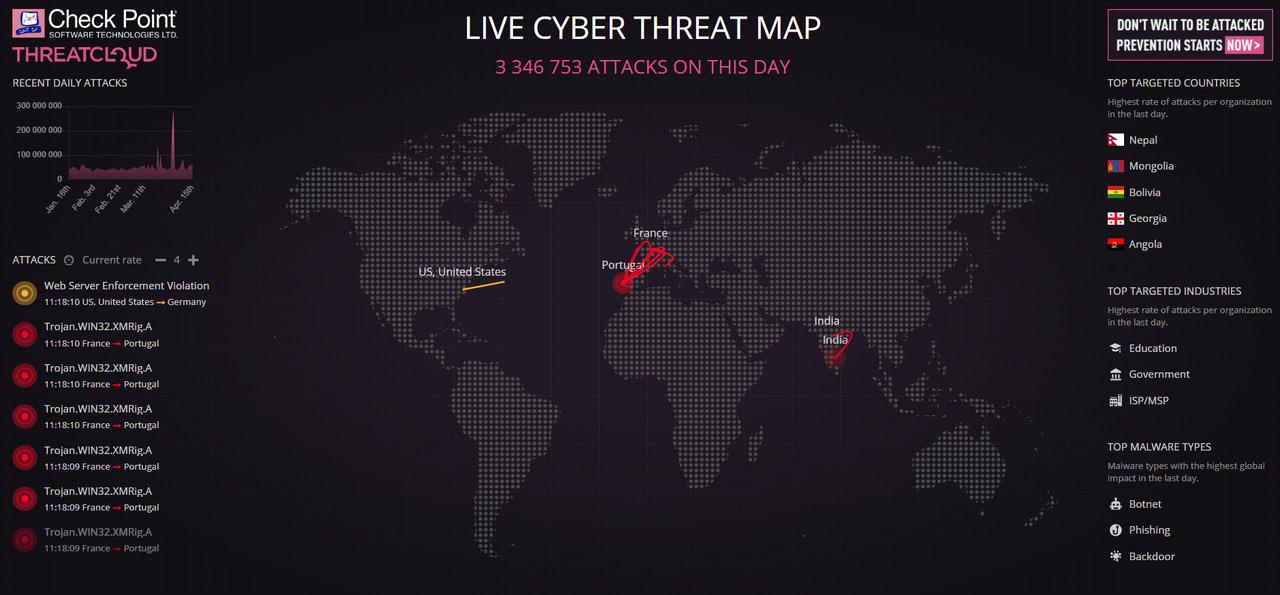
Live Cyber Threat
Why Is it Important to Check IP for Blacklist Regularly?
It is imperative to monitor your online business’s health since it directly relates to your profit and brand reputation. Enforcing the best practices may guarantee you profit, but this is not enough to save you from the IP blacklist sentence.
As we have already noted, it is ridiculously easy to get into the IP blacklist, but it is tricky to get out. According to stats, every business online will get into IP blacklist once. However, you can diminish harmful consequences if you act quickly.
Therefore, the first reason why you should systematically check IP for blacklist is that blacklist providers do not notify users about being listed. They add the IP address to the database and mark you as a spammer or attacker, starting to ruin your sender’s reputation.
If you notice such signs as
- Increasingly low deliverability rate;
- A significant drop in conversions;
- Numerous delivery failure notifications.
It is time to verify IP blacklisting.
Note these signs are not the 100% identifiers that something is wrong with your IP address. The same set of signs also indicate that your domain is blacklisted, so you should check this as well.
The second reason is, you never know whether you are on the blacklist or not at this precise moment. Blacklists are constantly updated to reflect current data. If someone else uses your IP address (that is the case of shared hosting that many startups or businesses on a shoestring budget go for), your IP address can lend on a blacklist at any time. That being said, today, it may be clean, but tomorrow it will get into all popular IP blacklists. Therefore, if you constantly verify IP blacklisting, you may save your email marketing campaign simply by asking your provider to change your IP address.
The third reason why it is vital to check IP for blacklist regularly is that ignoring this situation may cause drastic aftermath for your online business. For instance, you may face such issues as:
- Problems with email marketing. If your IP address is blacklisted, MSP will block your emails. This will drastically decrease your deliverability rate and cause a decline in open rates. As a result, you risk ending up with a low profit and low ROI.
- Destroy of brand reputation. No one wants to deal with a business whose IP address is blacklisted. No one cares whether you were listed accidentally or not. If you are blacklisted, then you did something wrong – the end of the story. Tarnished reputation has detrimental consequences for every business.
- Additional expenses. Delist yourself from the database and regain your reputation may cost you lots of money and time.
To sum up, it is crucial to check IP for blacklist regularly since it helps to keep your business running.

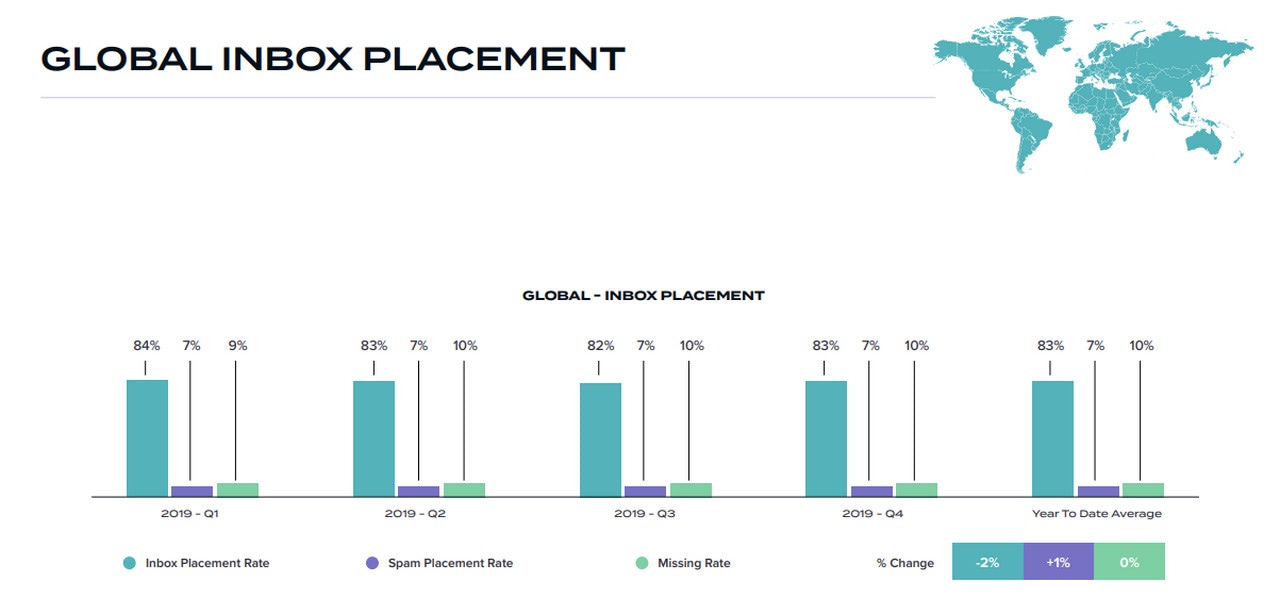
2020 Email Deliverability Benchmark
How to Verify IP blacklisting
So, how to check IP for a blacklist? After all, there are more than one hundred respected IP blacklists on the web; and, each one can list your IP address and block your activity, setting up a significant roadblock on your path to a successful email marketing campaign.
Much like with checking domain blacklists, verify IP blacklisting is a straightforward process. It involves two simple steps. Let us consider them closely. Remember to check the status pages of these services to keep your website up to date.
Step 1 –Get Your Email Server’s IP Address
The first and the only thing you need is your IP address, or to be more precise, the email server’s IP address. Note it is not your public IP address.
The easiest way to find it is to use MxToolbox. There you can look up your IP address simply by inserting your website’s domain name into the input field. MXToolbox will scan your website and server and give you an 8-11 digit address. So even non-tech-savvy people can do this without a helping hand from developers.
Step 2 – Use a Professional Service to Verify IP Blacklisting
Now when you have your email server’s IP address, you can run some IP blacklist checks. Open every IP blacklist and enter your IP address there.
To verify IP blacklisting quickly and efficiently, use professional services that do multiple checks simultaneously, for example, Unspam. It checks a mail server IP address across over 100 email blacklists.
Moreover, anyone can handle it. Just send an email to the testing address and get a thorough report within minutes. You will also get some additional information, such as data about your domain status, errors with SPF record or DMARC authentication, and even possible issues with accessibility and reverse DNS, that give you insights on improving your email marketing in the future.

How to Remove Your IP Address from a Blacklist
The good news is every major blacklisting company offers ways to change your status. This process is quite simple. Generally, it involves three major steps.
- The first step requires you to get acquainted with the IP blacklist provider. You should familiarize yourself with its policy, standards, and criteria to be removed.
- The second step requires you to meet all the requirements set by the blacklisting company. For example, you need to check for viruses in the PC, server, and website, eliminate all compromised email addresses in your subscription list, regain your sender reputation, offer a valid explanation, etc.
- The third step requires you to file a request and wait for a response. As a rule, it takes 12-24 hours.
The important thing to note, sometimes it is not easy to delist your IP address when it comes to a VPN or proxy IP address. In this case, it is better to change your IP address or hosting provider.
How to Avoid IP Blacklists – Best Practices
Along with checking IP for blacklists regularly, it is crucial to follow the best practices. There is a whole list of rules that you need to adhere to in order to avoid an IP blacklist sentence. Here they are:
- Invest in a trusted hosting provider.
- Opt-in favor of static IP address.
- Ensure no unauthorized traffic is going out.
- Make sure each device on your network is clean.
- Make sure your PC or website does not have viruses.
- Make sure the configuration of the server is correct.
- Make sure your server security is up to date.
- Check VPN or proxy to avoid tainted IP addresses.
- Be diligent in creating messages. Align them with the best practices for high deliverability like using the unique subject line, personalized content, mobile-friendly design, etc.
- Maintain your mailing list properly: clean it up regularly to get rid of incorrect email addresses.
- Always add unsubscribe option.
- Make an unsubscribe process simple.
- Honor unsubscribe request.
- Use a two-step email verification process for getting new subscribers.
- Gradually grow the mailing list over time and exhibit good email etiquette.
- Verify email newsletter before sending it out.
- Finally, keep an eye on open and click-through rates and other vital email campaign stats. Examine the performance data to ditch addresses that cause soft bounce rate.

10 Email Marketing Do’s and Don’ts Infographic
Conclusion
Online threats are a serious issue that costs a bulk of the money to businesses all around the Globe. It comes as no surprise that cybersecurity companies and MSP are getting more strict and ruthless each year to fight attackers and hackers efficiently. However, this aggressive policy that ensures a safe environment for end-user causes some problems to email marketers.
These days, everyone, even those who have never sent a single spam email, may end up on the IP blacklist. It is just inevitable. However, it does not mean they will face the consequences of being blocked. To avoid the aftermath of being listed on the blacklist, verify IP blacklisting systematically and act quickly to fix issues right away.

